SQL Server-Side Trace…with an example using Sage 500 ERP


This topic has been written about many times. I am writing this post with a focus on Sage 500 ERP. The reason I am focusing on this as an example is that I have done quite a bit of work recently with some Sage 500 ERP customers and partners only to discover that most of them were using SQL Profiler on a system already experiencing severe pressures. Yet it needed to be done to satisfy the needs of Sage Support in order to provide more information on a support case.

SQL Profiler, also know as a Client-Side Trace, only adds to the pressure. An article by Andrew Kelly from 2008 does a nice job of explaining some the differences between the two and why you would choose over the other. The article can be found at  http://www.sqlmag.com/article/performance/sql-server-profiler-or-server-side-trace-.

We are now going to concentrate on Server-Side Trace for the rest of this post. This is still relevant with most of the Sage 500 ERP and Sage X3 ERP implementations and would most likely be a benefit to you, at least that has been my experience over the past few months. I say that because we will discuss another technology feature that was introduced in SQL Server 2008 is Extended Events. This feature has been greatly expanded in the upcoming version, SQL Server 2012. If you want to read more about this feature this is a good starting point http://msdn.microsoft.com/en-us/library/dd822788(v=SQL.100).aspx. Jonathan Kehayias has many blog posts on this subject matter and is probably the industry expert on this topic in my opinion.

We will cover some foundation related to Trace Events and Trace Columns. This will provide you with resources and knowledge you will need to work with Server-Side Trace.

One way to approach this is to use SQL Profiler to configure your trace then you can do a File->Export->Script Trace Definition to write out the SQL Script that you can use to perform a Server-Side Trace. This can be a great way to get familiar with and transition from what you have been doing for probably many years.

Complete list of events
http://msdn.microsoft.com/en-us/library/ms186265.aspx

You can also select the Trace Events with the following syntax.

   1: -- Trace Events

   2: SELECT  e.trace_event_id, 

   3:         e.category_id,

   4:         e.name as traceeventname, 

   5:         cat.name as categoryname, 

   6:         cat.type

   7:     FROM sys.trace_events e          

   8:         INNER JOIN sys.trace_categories AS cat  ON e.category_id = cat.category_id

   9:     ORDER BY e.category_id, e.trace_event_id

Complete list of columns

http://msdn.microsoft.com/en-us/library/ms190762.aspx

You can also select the Trace Columns by Trace Event with the following syntax.

   1: SELECT   e.Trace_Event_ID,

   2:          e.name AS Event_Descr,     

   3:          c.trace_column_id,

   4:          c.name AS Column_Descr,

   5:          c.type_name,

   6:          c.is_filterable

   7: FROM sys.trace_events e

   8: INNER JOIN sys.trace_event_bindings b

   9:   ON b.trace_Event_ID = e.Trace_Event_ID

  10: INNER JOIN sys.trace_columns c          

  11:   ON b.trace_column_id = c.trace_column_id

The Server-Side Trace consists, for the most part, of four components to get a trace running. The four components are:

  • sp_trace_create – http://msdn.microsoft.com/en-us/library/ms190362.aspx

    The procedure takes 5 parameters. One of which is an Output.  It is used to create the trace definition.

       TraceID         – ID of the trace, this is an Output parameter and will provide the TraceID

       Options         – several different options that can be set (refer to the link above for more details)

       TraceFile      – physical file name of the trace file you will write to

       MaxFileSize  – size of the file, once the file reaches this size it will close the file and create subsequent files

       StopTime     – used to specify a time to stop the trace

       FileCount     – used to specify the maximum number of trace files (optional0

  • sp_trace_setevent – http://msdn.microsoft.com/en-us/library/ms186265.aspx

    The procedure takes 4 parameters. It is used to specify what event and what column to capture.

       TraceID     – ID of the trace

       EventID     – ID of the event you wish to capture

       ColumnID – ID of the column you wish to capture

       On              – this will set the event on or off

  • sp_trace_setfilter – http://msdn.microsoft.com/en-us/library/ms174404.aspx

    This procedure takes 5 parameters. It is used to determine what to include and/or exclude from the collection. 
       TraceID                          – ID of the trace

       ColumnID                      – ID of the column you wish to set the filter on

       LogicalOperator           – specify the type of operation, AND or OR

       ComparisonOperator – specify the operand type (e.g. =, <>, >, <, >=, <=, like, not like)

       Value                              – value used for the comparison

  • sp_trace_setstatus – http://msdn.microsoft.com/en-us/library/ms176034.aspx

    This procedure takes 2 parameters. It is used to change the status of the trace event. The close will also delete the trace definition. This delete does not delete the trace files that were created.

       TraceID – ID of the trace

       Status    – stop(0), start(1) and close(2) trace, you must stop a trace in order to close a trace

  • So how do we use these commands. Well let’s answer some questions that I had while I was first starting out.

    How do I create a trace?

    You need to make sure that the folder exists for the tracefile and the SQL Server Service account user has permissions to write to that folder. It goes without saying but you should also make sure that you have ample disk space where the tracefile is about to write as well.

    First you need to declare your variables.

       1: -- Declare variables 

       2: DECLARE @rc INT 

       3: DECLARE @TraceID INT 

       4: DECLARE @maxFileSize bigint 

       5: DECLARE @fileName NVARCHAR(128) 

       6: DECLARE @on bit 

       7: DECLARE @stoptime DATETIME

    Then you need to provide default values for these variables. Remember TraceID is an OUTPUT during the create phase so it will be assigned later.

       1: -- Set values 

       2: SET @maxFileSize = 5 

       3: SET @fileName = N'C:\Perflogs\MyTrace' 

       4: SET @on = 1 

       5: SET @stoptime = DATEADD(hour,3,GETDATE())

    Create the trace definition and verify that it was successful.

       1: -- Create trace 

       2: EXEC @rc = sp_trace_create @TraceID output, 2, @fileName, 

       3:                @maxFileSize, @stoptime  

       4:  

       5: -- If error end process 

       6: IF (@rc != 0) GOTO error 

       7:  

       8: /*

       9:     THIS WILL BE WHERE YOU PLACE YOUR CODE

      10:     THAT WILL SET THE EVENTS TO COLLECT AND

      11:     FILTER DATA FOR YOUR TRACE

      12: */

      13:  

      14:  

      15: -- Start the trace 

      16: EXEC sp_trace_setstatus @TraceID, 1 

      17:   

      18: -- display trace id for future references  

      19: SELECT TraceID=@TraceID  

      20: GOTO finish  

      21:  

      22: -- error trap 

      23: error:  

      24: SELECT ErrorCode=@rc  

      25:  

      26: -- exit 

      27: finish:  

      28: GO


    Define the events and data to collect. Here are few that you would normally configure in SQL Profiler that Sage always requests. In the example below, using the first execution line from row 3, this is basically asking for the Event “RPC:Completed” which is event 10, column 1 which is “TextData” and  set the event definition to 1 meaning on. See Image 1 below for how to discover this information.

       1:  

       2: -- RPC:Completed

       3: exec sp_trace_setevent @TraceID, 10, 1, @on

       4: exec sp_trace_setevent @TraceID, 10, 6, @on

       5: exec sp_trace_setevent @TraceID, 10, 9, @on

       6: exec sp_trace_setevent @TraceID, 10, 10, @on

       7: exec sp_trace_setevent @TraceID, 10, 11, @on

       8: exec sp_trace_setevent @TraceID, 10, 12, @on

       9: exec sp_trace_setevent @TraceID, 10, 13, @on

      10: exec sp_trace_setevent @TraceID, 10, 14, @on

      11: exec sp_trace_setevent @TraceID, 10, 15, @on

      12: exec sp_trace_setevent @TraceID, 10, 16, @on

      13: exec sp_trace_setevent @TraceID, 10, 17, @on

      14: exec sp_trace_setevent @TraceID, 10, 18, @on

      15: exec sp_trace_setevent @TraceID, 10, 27, @on

      16:  

      17: -- SQL:BatchCompleted

      18: exec sp_trace_setevent @TraceID, 12, 1, @on

      19: exec sp_trace_setevent @TraceID, 12, 6, @on

      20: exec sp_trace_setevent @TraceID, 12, 9, @on

      21: exec sp_trace_setevent @TraceID, 12, 10, @on

      22: exec sp_trace_setevent @TraceID, 12, 11, @on

      23: exec sp_trace_setevent @TraceID, 12, 12, @on

      24: exec sp_trace_setevent @TraceID, 12, 13, @on

      25: exec sp_trace_setevent @TraceID, 12, 14, @on

      26: exec sp_trace_setevent @TraceID, 12, 15, @on

      27: exec sp_trace_setevent @TraceID, 12, 16, @on

      28: exec sp_trace_setevent @TraceID, 12, 17, @on

      29: exec sp_trace_setevent @TraceID, 12, 18, @on

      30: exec sp_trace_setevent @TraceID, 12, 27, @on

      31:  

      32: -- SP:Completed

      33: exec sp_trace_setevent @TraceID, 43, 1, @on

      34: exec sp_trace_setevent @TraceID, 43, 6, @on

      35: exec sp_trace_setevent @TraceID, 43, 9, @on

      36: exec sp_trace_setevent @TraceID, 43, 10, @on

      37: exec sp_trace_setevent @TraceID, 43, 11, @on

      38: exec sp_trace_setevent @TraceID, 43, 12, @on

      39: exec sp_trace_setevent @TraceID, 43, 13, @on

      40: exec sp_trace_setevent @TraceID, 43, 14, @on

      41: exec sp_trace_setevent @TraceID, 43, 15, @on

      42: exec sp_trace_setevent @TraceID, 43, 16, @on

      43: exec sp_trace_setevent @TraceID, 43, 17, @on

      44: exec sp_trace_setevent @TraceID, 43, 18, @on

      45: exec sp_trace_setevent @TraceID, 43, 27, @on

      46: exec sp_trace_setevent @TraceID, 43, 34, @on

      47: exec sp_trace_setevent @TraceID, 43, 35, @on

      48:  

      49: -- SP:StmtStarting

      50: exec sp_trace_setevent @TraceID, 44, 1, @on

      51: exec sp_trace_setevent @TraceID, 44, 3, @on

      52: exec sp_trace_setevent @TraceID, 44, 12, @on

      53: exec sp_trace_setevent @TraceID, 44, 14, @on

      54: exec sp_trace_setevent @TraceID, 44, 22, @on

      55: exec sp_trace_setevent @TraceID, 44, 26, @on

      56: exec sp_trace_setevent @TraceID, 44, 27, @on

      57: exec sp_trace_setevent @TraceID, 44, 34, @on

      58: exec sp_trace_setevent @TraceID, 44, 35, @on

      59:  

      60: -- SQL:BatchStarting

      61: exec sp_trace_setevent @TraceID, 13, 1, @on

      62: exec sp_trace_setevent @TraceID, 13, 3, @on

      63: exec sp_trace_setevent @TraceID, 13, 12, @on

      64: exec sp_trace_setevent @TraceID, 13, 14, @on

      65: exec sp_trace_setevent @TraceID, 13, 26, @on

      66: exec sp_trace_setevent @TraceID, 13, 27, @on

      67: exec sp_trace_setevent @TraceID, 13, 35, @on

      68:  

      69: -- Exec Prepared SQL

      70: exec sp_trace_setevent @TraceID, 72, 1, @on

      71: exec sp_trace_setevent @TraceID, 72, 6, @on

      72: exec sp_trace_setevent @TraceID, 72, 9, @on

      73: exec sp_trace_setevent @TraceID, 72, 10, @on

      74: exec sp_trace_setevent @TraceID, 72, 11, @on

      75: exec sp_trace_setevent @TraceID, 72, 12, @on

      76: exec sp_trace_setevent @TraceID, 72, 13, @on

      77: exec sp_trace_setevent @TraceID, 72, 14, @on

      78: exec sp_trace_setevent @TraceID, 72, 15, @on

      79: exec sp_trace_setevent @TraceID, 72, 16, @on

      80: exec sp_trace_setevent @TraceID, 72, 17, @on

      81: exec sp_trace_setevent @TraceID, 72, 18, @on

      82: exec sp_trace_setevent @TraceID, 72, 27, @on

      83: exec sp_trace_setevent @TraceID, 72, 34, @on

      84: exec sp_trace_setevent @TraceID, 72, 35, @on

      85:  

      86:  

      87: -- Execution Warnings 

      88: exec sp_trace_setevent @TraceID, 67, 1, @on

      89: exec sp_trace_setevent @TraceID, 67, 8, @on

      90: exec sp_trace_setevent @TraceID, 67, 10, @on

      91: exec sp_trace_setevent @TraceID, 67, 11, @on

      92: exec sp_trace_setevent @TraceID, 67, 12, @on

      93: exec sp_trace_setevent @TraceID, 67, 14, @on

      94: exec sp_trace_setevent @TraceID, 67, 27, @on

      95: exec sp_trace_setevent @TraceID, 67, 31, @on

      96: exec sp_trace_setevent @TraceID, 67, 35, @on

      97:  


    Image 1 – This shows you how to select information for the event and column.

       1: -- Get trace Event and Column details for event 10 RPC:Completed

       2: SELECT   e.Trace_Event_ID,

       3:          e.name AS Event_Descr,     

       4:          c.trace_column_id,

       5:          c.name AS Column_Descr,

       6:          c.type_name,

       7:          c.is_filterable

       8: FROM sys.trace_events e

       9: INNER JOIN sys.trace_event_bindings b

      10:   ON b.trace_Event_ID = e.Trace_Event_ID

      11: INNER JOIN sys.trace_columns c          

      12:   ON b.trace_column_id = c.trace_column_id

      13: WHERE e.Trace_Event_ID = 10

    Now if you wish to set filters on the information you wish to collect would do that next. I have some specific filters created plus there are a few commented out just for examples. Make sure to visit the setfilter link above to get a more detailed understanding on this subject as you may not get the results you were hoping just because of how this is configured.

       1: -- Set Filters 

       2: DECLARE @DB_ID int

       3: SET @DB_ID = DB_ID('MAS500_app')

       4: -- Creates a filter for only the database MAS500_app

       5: EXEC sp_trace_setfilter @TraceID, 3, 0, 0, @DB_ID                           -- 3 : DatabaseID

       6: -- Creates a filter to include only if column TextData contains tsoSalesOrder

       7: EXEC sp_trace_setfilter @TraceID, 1, 0, 6, N'%tsoSalesOrder%'                -- 1 : TextData, The 6 means LIKE

       8: -- Creates a filter to exclude application SQL Profiler and SQL Agent

       9: EXEC sp_trace_setfilter @TraceID, 10, 0, 7, N'SQL Profiler%'                -- The 7 means NOT LIKE

      10: EXEC sp_trace_setfilter @TraceID, 10, 0, 7, N'SQL Agent%'                    -- The 7 means NOT LIKE

      11:  

      12: -- Some addtional filter examples that might be useful

      13: -- To set a filter at the Server level instead of or in addtition to the database

      14: --EXEC sp_trace_setfilter @TraceID, 8, 0, 0, 'SERVERNAME'                   -- 8 : HostName

      15: -- This means to include if the ObjectName is equal to the passed in value

      16: --EXEC sp_trace_setfilter @TraceID, 34, 0, 0, 'spsoCreateSalesOrder'        -- 34 : ObjectName

      17: -- This means that TextData will = the value passed in

      18: --EXEC sp_trace_setfilter @TraceID, 1, 0, 0, 'Timeout getting Lock'         -- 1 : TextData

    Now start the Trace.

       1: -- Start the trace 

       2: EXEC sp_trace_setstatus @TraceID, 1 

    I already covered the error trap and exit logic in the Create Trace segment above but I will provide you with this code again just for clarity sake.

       1: -- display trace id for future references  

       2: SELECT TraceID=@TraceID  

       3: GOTO finish  

       4:  

       5: -- error trap 

       6: error:  

       7: SELECT ErrorCode=@rc  

       8:  

       9: -- exit 

      10: finish:  

      11: GO

    How do I find out about my traces(s)?

    To get a list of all the running traces on the server use the following statement. This will also show the SQL Server Default trace which is always traceid 1.

       1: SELECT * FROM :: fn_trace_getinfo(default)

    To look at the filters that are applied to a trace.

       1: SELECT * FROM :: fn_trace_getfilterinfo(default)

    To look at information about the events being traced by a trace use the following select.

       1: SELECT * FROM :: fn_trace_geteventinfo(default)

    We covered this already but I am providing these commands again just for clarity sake and a simple point of reference for you related to the setstatus procedure.

       1: -- To start a trace

       2: sp_trace_setstatus traceid, 1                -- TraceId would be the value of the trace

       3: -- To stop a trace 

       4: sp_trace_setstatus traceid, 0                -- TraceId would be the value of the trace

       5: -- To close and delete a trace

       6: sp_trace_setstatus traceid, 2                -- TraceId would be the value of the trace

    What do I do with my trace now that I am done?

    Well you have several options available to you. You can simply open the trace file with SQL Profiler and scroll through it like you might have done in the past or you can load it into a SQL table so you can run queries against it.

    The following code snippets show you how you can load data into a new table or an existing table from a trace file.

       1: -- Load into a new table (need to type in the name created above)

       2: SELECT * INTO master..TraceTable_RKL 

       3: FROM ::fn_trace_gettable('c:\Perflogs\MyTrace.trc', DEFAULT) 

       4:  

       5: -- Load into an existing table  (need to type in the name created above)

       6: INSERT INTO master..TraceTable_RKL 

       7: SELECT * FROM ::fn_trace_gettable('C:\Perflogs\MyTrace.trc', DEFAULT) 

    Once you have the data loaded into a table you can look at it just like it is any other table.

       1: -- Look at data in table

       2: SELECT * FROM master..TraceTable_RKL

    Don’t forget to cleanup the table when you are finished.

       1: -- cleanup the table

       2: drop table master..TraceTable_RKL

    Can I look at the details/contents of the Trace File?

    Well yes you can.

       1: -- View the contents of the trace file without loading into a table

       2: -- or using SQL Profiler

       3: SELECT * FROM ::fn_trace_gettable('C:\Perflogs\MyTrace.trc', DEFAULT) 

    I hope you found this useful. Thanks for stopping by. Until next time…

    Sage 500 ERP v7.4 Invoice Overpayments – Continued


    It was not my original intention to have a continuation on the original blog which you can see at  http://joenoll.rklesolutions.com/2012/01/04/sage-500-erp-v7-4-invoice-overpayments, however my good friend Richard Sisk at Sage provided some follow-up on the original post that provide additional insight into this new process. I thought I needed to follow-up on this new found information to complete my prior posting. This is great information. Thank you Rick!

    In the original post I closed out by saying it would be nice to be able to post a second payment against the same invoice even though the balance was already < 0. It turns out this does exist it just did not work as I thought it would so I missed it. I apologize for the oversight but in this post I detail this newfound information for you.

    I have entered another payment from Aldebrn for $150. I am applying this payment to against an invoice that has a current balance of $0. This brings the new balance to –$150.

    image

    Now I register and post this batch. This makes this record permanent. My next step is to create another batch with a another payment for Aldebrn of $135, as shown below. As you can see by entering in the Invoice No 1113 and then pressing the Tab key key it retrieves the invoice information showing the current balance of –$150. I then key in the Payment Applied of $135 as mentioned by Richard Sisk and it now brings the value of the new balance to –$285.

    image

    So I stand corrected in my comment in my original post. It appears that Sage has accommodated for this possibility!

    How is this being treated in the database is quite interesting and simplistic. You can see this with some simple selects as shown below. The TranNo and the corresponding keys are based on the values from my demonstration and would most likely be different in your system.

       1: -- Invoice Header information

       2: SELECT InvcKey, TranID, TranDate, CompanyID,

       3:        TranAmt, Balance

       4: FROM tarInvoice

       5: WHERE tranno like '%1113%';

       6:  

       7: -- Invoice Header Application information

       8: SELECT ApplyToInvcKey, PostDate, PmtAmt, ApplyFromPmtKey, ApplyFromTranID

       9: FROM tarInvoiceAppl

      10: WHERE ApplyToInvcKey = 1307;

      11:  

      12: -- Customer Payment Header

      13: SELECT CustPmtKey, BatchKey, PmtRcptDate, 

      14:     PostDate, TranID, TranAmt, UnappliedAmt

      15: FROM tarCustPmt

      16: WHERE CustPmtKey IN (515, 516, 517);

      17:  

      18: -- Customer Payment Application

      19: SELECT CustPmtKey, ApplyToInvcKey, ApplyToTranDate, ApplyToTranID,

      20:         PmtAmt

      21: FROM tarCustPmtAppl

      22: WHERE CustPmtKey IN (515, 516, 517);


    Results of above Select statements in order of the selects.

    image

    I recommend that you read up on this functionality in more detail and experiment with it in a test environment of your own. It is a very useful enhancement. Thank you Sage!

    Sage 500 ERP v7.4 Invoice Overpayments


    This post is not meant to be a full training on how to enter and post invoices and cash in Sage 500 ERP, it is just meant to provide an overview of the a feature recently added in version 7.4. This will describe the new AR Invoice Payment functionality of Sage 500 ERP v7.4. This new functionality allows over-payment tracking by invoice instead of lump sum. This provides more accurate tracking of the overpayment at the invoice level for reconciliation. In addition to the tracking it also adds the ability to apply this overpayment to a balance on another invoice.

    So lets get right into how this works.

    Enter Overpayments against Invoices

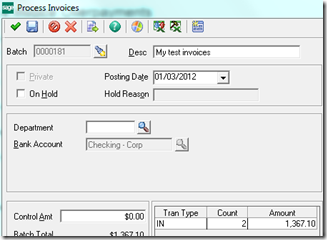
    I have entered 2 invoices in this scenario for the same customer. Here is the summary of those 2 invoice amounts in the Invoice Batch. I posted this batch.

    image

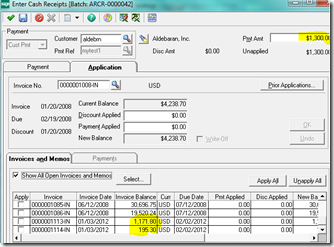
    Now I enter a payment of $1,300 from the same customer I had the invoices for. The customer references invoice 1113. So I only want to apply this payment to this invoice even though it appears to overpay this balance.

    image

    You can just enter the Payment Applied amount or you can click on the Apply checkbox next to the invoice in the grid. If you do that it will select that invoice and put the Balance only of the invoice in the Payment Applied field. This is to bring the invoice to $0. You will need to manually enter the actual Payment amount in the Payment Applied field to force the overpayment as shown below.

    image

    Click OK, then save and close this transaction. I then proceeded to Post this transaction.

    If I go look at this invoice now it shows my overpayment and –$128.20 balance.

    image

    I have the ability to Process Refunds. This is a new function added in Sage 500 ERP v7.4 as well but not part of this discussion. We will now proceed to use this overpayment to apply against our other test invoice we created. The assumption here for you is that I was directed by the client to make this application correction.

    Apply Overpayments against other Invoices

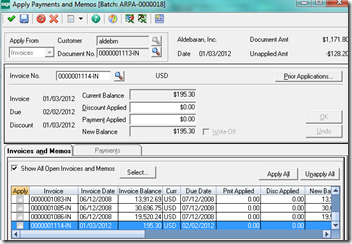
    We can now select this invoice with an overpayment as shown below to use the unapplied amount to post against another invoice. Notice that I have select Invoices as my Apply From in order to select Document No. 1113.

    image

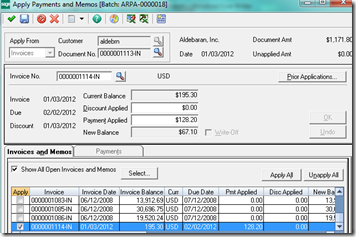
    Now I select the other test invoice 1114 below to apply the overpayment. In this case I still have a balance but I have exhausted the overpayment from the original invoice.

    image

    Now you save and post.

    In Closing

    I personally feel that one thing is missing from this feature that would enhance this. Let’s say you already had a $1,000 invoice and the client sent you an $1,100 check. Based on what you have learned above you would have applied the $1,100 to the $1,000 invoice, giving you a overpayment of $100 so the invoice balance would be –$100. Now the customer sends you another check by mistake of $200 and referenced this invoice. It would be beneficial if you had a way to enter this payment and apply as an additional overpayment to the same invoice bringing the balance to –$300. Again just for reconciliation purposes based on the clients detail with the payment.

    I would like to thank Tim Efinger, a member of the team at RKL eSolutions LLC for his assistance in some of the details in this post.

    Even without this additional functionality I just described this is still a welcome addition to Sage ERP 500 v7.4.

    Please see the continuation of this post that I created based on the feedback from Richard Sisk at Sage. It shows that you can apply more payments even if the balance is already negative or overpaid. http://joenoll.rklesolutions.com/2012/01/08/sage-500-erp-v7-4-invoice-overpayments-continued/

    Windows Server 2008 High Performance vs Balanced Setting


    You can see in the Specification area below that the system contains a 2.70 GHz processor yet the Core Speed area shows that the system is actually running at 798.3 MHz. How can that be you may ask? Well that is what I continue to see repeatedly when logging in to systems when I am asked to review some performance issues.

    I am not saying this is the only issue but fixing this issue alone has solved quite a few of the reported issues, especially when I hear that my system is fast for a while then it slows down after several days or so. The tool shown above is called CPU-Z from CPUID. There are other tools that you can use. I am just a fan of this one. It is free and very small.

    So now let’s go look at where this is configured. I am doing the changes below in Windows Server 2008. This is in Windows Server Power Options.

    Go to Control Panel-System and Security-Power Options

    Make sure the setting has High Performance selected

    If the above setting was balanced it will adjust the Core Speed down based on average use to save on power and energy. Once it settles in on a number for Balanced it will not speed up again to full speed until you do a reboot. This is true in a virtual server as well.

    In addition to the Windows Server 2008 your physical systems also contain BIOS settings as well to allow you to configure the system to run balanced or optimized as well. Please consult your hardware documentation for more information on CPU Throttling.

    These terms are a little misleading in my mind as I think this means efficiently in terms of power consumption. I understand why these settings are important to save energy but if the purpose of your system is to be a high performance system then this setting defeats the purpose.

    New Folder Compare Utility in Sage 500 ERP


    Let me start by saying I am quite pleased with the new brand name for what was previously referred to as Sage ERP MAS 500, or Sage MAS 500 or Best Enterprise or Acuity depending on how long you have been around. I would say that we were faired quite well in the rebranding process in maintaining our prior identity.

    Sorry, I digress now let me get back to the topic of this blog post. In version Sage 500 ERP 7.40.1, which is the August 2011 PU, I found a nice surprise. A new utility called Folder Compare. After much poking and prodding around the Folder Compare I reached out to my friend Linda Cade for a little clarification on a few things. She quickly provided me with the missing component. I knew she was the right person for the question. If you do not know Linda you can check her blog out at http://sageerpmas500users.wordpress.com/.

    So why was I so excited about this Folder Compare utility you might ask. It may seem strange since we have been using WinDiff and Beyond Compare for so many years to do this very thing. However it is quite nice to just have this functionality built right in and available at the client site.

    The Sage 500 ERP Folder Compare utility can be found in the following folder “C:\Program Files (x86)\Sage Software\Sage MAS 500 Client\Managed Applications”. This folder may vary based on where you installed the Sage 500 ERP Client. The Application is Accounting.Application.CS.FolderCompare. There are 2 files with this name: one is the XML application.config file, the other one is the actual application EXE.

    Today I downloaded Sage 500 ERP v7.4.2 the December 2011 PU. Before I installed this PU I ran the Folder Compare utility to Create Comparison File. This process will create an XML file of the current Sage 500 ERP Client folder.

    I created a folder structure to preserve these files for future use. You can see my structure below. This is not necessary just personal preference.

    In a network scenario you may wish to create a folder share similar to what you might do with your shared reports as described in the Sage KB article called “How to configure reports to run from a shared location.” It is Resolution ID 2562. This will allow you to compare your clients from one central source.

    When you open the Folder Compare utility it defaults to the Client folder. You can simply click the Create Comparison File button which will ask you where to save the file and what to call it. I just used the default name it generated and placed it in my v741 folder that I created above.

    Now that you have created the base file you can exit Folder Compare and install the 7.40.2 product update. Once that is completed you once again run the Folder Compare utility. Now create another comparison file of the Client folder. This file I am not placing in my v742 folder.

    Now we select the Base file, in this case is the first one I created in the v741 folder and the Comparison file found in the v742 folder. Once you have your files selected click on the Comparison tab and click on the Compare files button.

    The results of the comparison will return. I have changed my View Settings below to only show the modified items. You can compare this to the accompanying PDF Sage provides with each update if you wish to dig into the components for further understanding.

    In the Options menu you can also put your name, email address and the sage support email address. This information will be the defaults if you decide email the comparison file to support for any reason. As you can see this will require a Case Number. Beware though it appears to email it in the background so it assumes you have the correct information in the Options settings.

    I hope you found this useful. I know Sage has some documentation on this but I have not seen it anywhere in the client folder.

    Create a Sage ERP MAS 500 User Permissions View


    SyntaxHighlighter.all()

    I see a lot of Sage ERP MAS 500 questions related to how to see what permissions a user has. I also see a lot of questions around the area of creating a BI view within MAS 500. I am
    going to use these 2 questions in my post today and provide a step by step example of how to solve both of these questions. I have posted the View before in the Community Forums so you might have seen this before.

    You will want to open SQL Server Management Studio. Then select the MAS 500 database and open a SQL Query Window, similar to the screen shot below.


    Copy the SQL Script below into your Query window and Execute this by clicking on the Execute button or pressing F5.

    Script to create SQL View (make sure you are in the MAS 500 database)

    IF object_id(N'dbo.vdvSecurPerms_RKL', 'V') IS NOT NULL
    	DROP VIEW dbo.vdvSecurPerms_RKL;
    GO
    
    
    CREATE VIEW dbo.vdvSecurPerms_RKL
    AS
    select    md.ModuleID
            , ug.UserGroupID
            , case
    			ISNULL(sem.Authorized,0)
                   when 0 then 'No'
                    when 1 then	'Yes'
                end	as 'Permission'
            , ls.LocalText as Description    
            , 'Event' as SecType
    from    tsmusergroup ug with (nolock)
            cross join tsmSecurEvent se with (nolock)
            inner join tsmModuleDef md with (nolock)
                on md.ModuleNo = se.ModuleNo
            left outer join tsmSecurEventPerm sem with (nolock)
                on se.SecurEventID = sem.SecurEventID and sem.UserGroupID = ug.UserGroupID
            inner join tsmLocalString ls with (nolock)
                on se.DescStrNo = ls.StringNo
    UNION ALL
    select    md.ModuleID
            , ug.UserGroupID
            , case tp.Rights
                    when 1 then	'Excluded'
                    when 2 then	'Display Only'
                    when 3 then	'Normal'
                    when 4 then	'Supervisory'
                else 'Excluded'
                end as 'Rights'
            , tsd.TaskLongName
            , 'Task' As SecType
    from    tsmUserGroup ug with (nolock)
            cross join tsmTask t with (nolock)
            left outer join tsmTaskPerm tp with (nolock)
                on ug.UserGroupID = tp.UserGroupID and tp.TaskID = t.TaskID
            join tsmModuleDef md with (nolock)
                on t.ModuleNo = md.ModuleNo
            join tsmTaskTypeDef ttd with (nolock)
                on t.TaskTypeID = ttd.TaskTypeID
            join tsmModuleStrDef msd with (nolock)
                on t.ModuleNo = msd.ModuleNo
            join tsmTaskStrDef tsd with (nolock)
                on t.TaskID = tsd.TaskID;
    GO
    
    
    GRANT SELECT ON dbo.vdvSecurPerms_RKL TO ApplicationDBRole;
    GO


    Script to execute SQL View

    This is just to view the results to make sure we get what was expected.

    select
    *
    from vdvSecurPerms_RKL;


    Create a BI Task in MAS 500

    Well assuming all went well up until now, the next step is to add this to the MAS 500 Business Desktop. We will now launch the MAS 500 client. I named the view starting with ‘vdv’ above because this is a requirement of MAS 500 for use with the BI engine. You can read more about that at http://www.rklesolutions.com/_downloads/Adding_Custom_Views_to_MAS_500_BI.pdf.

    You must first decide where you want the BI to reside. As a rule of thumb whenever I am creating any custom views on the Desktop I like to create my own folder this way it keeps the menu clean.
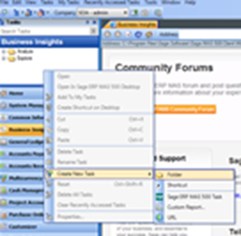
    So with that in mind I would go the the Business Insights module and right-click in the frame, select Create New Task and Folder, as shown below. Sorry it is a little bit cloudy but you should get the idea. Then I would name the Folder something like ‘My Custom Views’.


    Create a new Folder.


    Name the Folder.


    Adding the BI View

    Now you can add the new BI View by navigating to the System Manager > Maintenance > Maintain Business Insights Views / Context Menus.


    The first thing you need to do is provide your new view with a name. I have called my example SecurityPermissions_RKL. If the name was already in use it would have retrieved that View.

    Next you can either key in or select from the lookup the View Name. I keyed in vdvSecurPerms_RKL, which is the name of the view we created earlier. Now provide a Caption to correspond with this View. The Caption value you enter will default into the Name and Description field. You can change these values if you like. I have left the Allow Load at Startup checked as well as the Default Permission.

    I did key in 100 for the Maximum Rows. This is new in MAS 500 v7.4. Thank you Sage for this one!

    I have also elected to make this a Type of Analyzer. This basically says that I am not mapping this View to any additional child records for drilling purposes. You should have noticed that when you click on the Analyzer radio button that 2 of the tabs on this form are no longer accessible. They are Navigation Tasks and Navigation Relationships.

    The only tab remaining is Column Mapping and for the purpose of this exercise I am not changing anything. If you wish to know more about this form you can visit the help on online documentation.

    Now Save your changes and close this form.


    Adding BI View as a Task to the Business Desktop

    The last step is to return to our Custom Folder right-click select Create New Task then Sage ERP MAS 500 Task from the context-menu. This will launch the form shown below only without the values.


    Select the Module…in my example I had place my View in the BI – Analyzer category, you may have used BI – Explorer. Then select your MAS 500 Task. This is the name you entered in the Caption earlier. The Setting and the Task Name will populate automatically. Click OK. You should see something like below, depending on where you placed this in your Desktop.


    You can now launch the task by double-clicking. Your new view should look something like the image below. You now have all the functionality for this view that you would for any other BI in MAS 500.

    I have 2 things I want to point out to you on the screen below. Notice in the bottom right corner the Rows:100. This is because of the value that I entered when I created my BI View earlier. The Max Rows Restrict Active is also because of that as well. This is very handy when a user may call you and say not all of the information is showing. If you want to get all of the rows you can simply click on the Show All icon on the Analyzer Toolbar. It is the 3rd icon from the left on the toolbar in the image below.

    Thanks for reading. I hope you found this helpful.

    Using Crystal Reports to Generate Reports from a Command Line


    A lot of Sage ERP MAS 500 clients ask us how they can have some reports generated automatically, put on a schedule and email them to team members. This is what I am going to discuss in the post. For this posting I am running on Windows Server 2008 R2 64 bit, SQL Server 2008 R2 64 bit and Sage ERP MAS 500 v 7.4.

    Before I go any further I want to provide a disclaimer. Configuring some of these items requires that you take additional steps to secure your database and network to ensure adequate protection. You could this for reports unrelated to MAS 500 as well. I am just using this based on where we have used it before.

    What we are doing here is creating a Crystal Report format that we wish to run to compile information for distribution to team members, etc. This could be a sales order listing by Salesperson sent to each salesperson, an AR Aging Report by Customer for your Salespeople or something as simple as a Customer list. We will be using this in our example. As you will see later the output can be various formats as supported by Crystal Reports.

    You will need the following items to accomplish this task.

    • Crystal Report runtime – this needs to be the actual version of the Windows Server that you will run this from
    • Crystal Report (rpt file) – this is the actual Crystal Report file that you created ahead of time
    • MAS 500 user account – this is the user that will be associated with the command line syntax to run the report, I recommend you create a MAS 500 user and make this user a Read Only user as well as limit what this user has access too based on what they need for the reporting process

    First you will need the Crystal Runtime files. You can download the files at the following locations.
    32-bit http://downloads.businessobjects.com/akdlm/cr4vs2010/CRforVS_redist_install_32bit_13_0_1.zip
    64-bit http://downloads.businessobjects.com/akdlm/cr4vs2010/CRforVS_redist_install_64bit_13_0_1.zip

    You are able to run this from the Sage ERP MAS 500 server or you can run this from another server against the MAS 500 server. So for my server configuration above if I place this on my server I will need the 64 bit version of the Crystal Report runtime. I could use the 32 bit version of Crystal Report runtime but I would need to have another server to run this from.

    Install the appropriate Crystal Report runtime to your selected server. The zip file also contains information about the parameters you pass to the crexport.exe runtime engine.

    The way we use this is to create single command line jobs that we schedule in Windows Task Scheduler. We create one job per report. There are many ways this can be accomplished and that is really a matter of preference and beyond the scope of this blog article. Again the key is to keep it simple.

    In our example we are running a Customer Listing which is formatted with the CustList.RPT format.

    Here is the command line I used:

    C:\crexport.exe -F “C:\CustList.rpt” -U “USER” -P “PWD” -S”SERVER” -D”mas500_app” -O “C:\CustList.pdf” -Epdf -XFile -N1


    Explaining the command syntax above:

    • C:\crexport.exe     : This is the drive letter where the exe is running from plus the runtime filename
    • -F “C:\CustList.rpt”     : This is the name of the Crystal Report to use for formatting
    • -U “USER”         : This is the MAS 500 username to connect with
    • -P “PWD”        : This is the user password
    • -S”SERVER”        : The name of the SQL Server
    • -D”mas500_app”    : The database name
    • -O “C:\CustList.pdf”    : The output path and file name
    • -Epdf            : Export file type, in this case it is a PDF (you can change this to any Export file type
    • -XFile            : To a file
    • -N1            : Number of copies

    NOTE: The space after the file tags (-F and –O) matter. Without it you will get an invalid report file message. You will also need spaces after the –U and –P tags, but not the –S or –D tags. Without that exact configuration it would get an invalid connection message.


    This is not as complex or flexible as Knowledge Sync for Sage ERP MAS 500 but it does provide a nice alternative. Obviously you can use Sage MI, Crystal Web Enterprise or SQL Reporting Services as other alternatives.


    Here is an example of a bat file solution. We have used this to as well. In this example we have created a bat file called CRExport.bat. The bat file contains the following commands. Then we just schedule the CRExport.bat file to run from Windows Task Scheduler. This runs all the commands one at a time. This example uses mailsend which is using SMTP and assumes you have a Mail such as Outlook Express or Outlook. This can be used to track all of the sent email this way. You can use other utilities to perform the mail send, some of which do not require the use of a client as described here. One that comes to mind is blat but there are many others and I am promoting one over the other just what works in your situation.

    It first deletes all the PDF files in the current folder. This is to prepare for the new files that will be generated. The next commands actually create the extract files in a PDF format. The SPERID in these examples would actually contain the Salesperson ID. You can see 2 new parameters in this example than explained earlier. The –A represents the name of a Parameter attribute in this case Salesperson that you are passing into the Crystal Report. The –J is the actual value for the –A parameter. This would be the actual value of a SPERID to create results for. The example below creates 2 different reports for each SPERID. After the reports are created they are then emailed to the appropriate Salesperson. For the mailsend command you would place the corresponding salesperson email address along with replacing the “DOMAIN” with your actual Domain name as well as “MAILSERVERNAME” with your mail server name. The –f is forward, -d is Domain, -smtp is the mail server, -t is the sender, -sub is the email subject and –a is the attachment along with the :application/pdf to describe what is being attached.

    del *.pdf

    c:\Mas500Reports\CrystalExport\crexport.exe -U”USER” -P”PWD” -S”SERVER” -D”mas500_app” -F”c:\Mas500Reports\SO\Reports\ShipToBySalesSched.rpt” -O”c:\Mas500Reports\CrystalExport\ShipToBySales-SPERID1.pdf” -Epdf -XFile -N1 -A”Salesperson” -J”SPERID1″

    c:\Mas500Reports\CrystalExport\crexport.exe -U”USER” -P”PWD” -S”SERVER” -D”mas500_app” -F”c:\Mas500Reports\SO\Reports\SalesOrderBySource.rpt” -O”c:\Mas500Reports\CrystalExport\SalesOrderBySource-SPERID1.pdf” -Epdf -XFile -N1 -A”Saleperson” -J”SPERID1″

    c:\Mas500Reports\CrystalExport\crexport.exe -U”USER” -P”PWD” -S”SERVER” -D”mas500_app” -F”c:\Mas500Reports\SO\Reports\ShipToBySalesSched.rpt” -O”c:\Mas500Reports\CrystalExport\ShipToBySales-SPERID2.pdf” -Epdf -XFile -N1 -A”Salesperson” -J”SPERID2″

    c:\Mas500Reports\CrystalExport\crexport.exe -U”USER” -P”PWD” -S”SERVER” -D”mas500_app” -F”c:\Mas500Reports\SO\Reports\SalesOrderBySource.rpt” -O”c:\Mas500Reports\CrystalExport\SalesOrderBySource-SPERID2.pdf” -Epdf -XFile -N1 -A”Saleperson” -J”SPERID2″

    mailsend -f SPERID1email@DOMAIN.com -d DOMAIN.local -smtp MAILSERVERNAME -t SENDERNAME@DOMAIN.com -sub “UnShipped Orders Report” -a ShipToBySales-SPERID1.pdf:application/pdf

    mailsend -f SPERID1email@DOMAIN.com -d DOMAIN.local -smtp MAILSERVERNAME -t SENDERNAME@DOMAIN.com -sub “Sales Order By Source Report” -a SalesOrderBySource-SPERID1.pdf:application/pdf

    mailsend -f SPERID2email@DOMAIN.com -d DOMAIN.local -smtp MAILSERVERNAME -t SENDERNAME@DOMAIN.com -sub “UnShipped Orders Report” -a ShipToBySales-SPERID2.pdf:application/pdf

    mailsend -f SPERID2email@DOMAIN.com -d DOMAIN.local -smtp MAILSERVERNAME -t SENDERNAME@DOMAIN.com -sub “Sales Order By Source Report” -a SalesOrderBySource-SPERID2.pdf:application/pdf

    How do I verify that Sage ERP MAS 500 v7.3 is Compliant?


    You can go to the https://www.pcisecuritystandards.org/approved_companies_providers/vpa_agreement.php web page and find that Sage ERP MAS 500 version 7.3 is PA-DSS compliant.  

    You then need to prove to the auditors that Sage ERP MAS 500 was implemented in accordance with our PA-DSS Implementation Guide: http://community.sagemas.com/t5/Installation-and-Technical/PA-DSS-Implementation-Guide-for-v7-3-Credit-Card-Processing/td-p/16235

    This is all the proof the auditors require as far as Sage ERP MAS 500 is concerned.

    There is only one level of certification in PA-DSS, the application and implementation is either compliant or not. PCI-DSS has different levels of certification and Sage ERP MAS 500 is compliant with any of the different PCI-DSS compliance levels.

    Once Sage ERP MAS 500 is at version 7.5 and utilizing Sage Exchange, MAS500 will no longer touch card holder information. The card holder data is gathered by Sage Exchange in a totally independent memory space and sent to the Sage Vault. Sage ERP MAS 500 then deals with an opaque pointer to the information stored in the vault. Sage Exchange is PA-DSS compliant. Sage ERP MAS 500 will no longer require PA-DSS certification because it no longer touches card holder data.

    The customer will still be required to be PCI-DSS compliant, so it doesn’t change the customer’s procedures. It only moves the PA-DSS compliance requirement from Sage ERP MAS 500 to Sage Exchange. You can learn more about Sage Exchange at http://www.sagepayments.com/Products-Services.

    I would like to thank Richard Sisk for input on this topic.